This is a tutorial for the iPhone pocket I originally posted here. I've never written a tutorial before now, so if I leave out something of importance don't hesitate to leave me a comment.
Materials I Used
2 fat quarters of corresponding fabric
matching thread
Tools Needed
pins
scissors and ruler or rotary cutter and mat
iron and ironing board
sewing machine
needle
*Please note that I switch between a 1/2" seam allowance and a 1/4" seam allowance for different steps*
*Also note that you can view a larger version of each picture by simply clicking on it*
1. Cut out the fabric. You will need two(2) pieces the outer fabric and two(2) pieces of the lining fabric 6" by 4 1/4". One(1) piece of the outer fabric 7 1/2" by 4 1/4", and one(1) piece of the lining fabric 6 1/2" by 4 1/4". That's six(6) pieces in total you need to cut out.
2. Make the first card slot. Using the piece of lining measuring 6 1/2" by 4 1/4", fold it in half with right sides together and sew a seam with a 1/2" seam allowance. Turn it right-side out and iron it flat. The finished measurements should be 3 1/4" by 4 1/4".
3. Sew the first card slot to the front. Choose one of your 6" by 4 1/4" pieces of outer fabric(we will call this the front panel) and lay it down with the good side facing up then place the piece from step 2 on it with the seam at the bottom. The distance from the bottom of the outer piece to the bottom of the card slot should be 1 1/2". Sew along the bottom of the card slot leaving a seam allowance of 1/4".
4. Make the second card slot. Take the piece of outer fabric measuring 7 1/2" by 4 1/4" and fold it in half with the right sides facing out and iron it flat. No sewing is needed for this step. It should measure 3 3/4" by 4 1/4".
 |
| The arrows show the ironed fold |
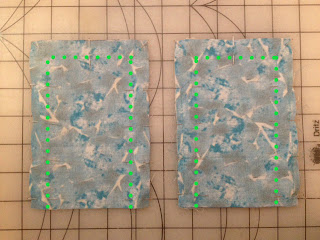
5. Sew the second card slot to the front. Pin the piece from step 4 onto the front panel making sure to line up the two bottom corners. Sew along where the dotted line is shown below and leave a 1/4" seam allowance.
Below is what your four(4) pieces should look like at this stage.
6. Sew the lining to the front and back panel. Put one piece of lining together with each of the panels with the right sides facing in. Pin and then sew both sides and the top with a 1/2" seam allowance. Leave the bottom open on both!
7. Trim the corners and turn inside out. Trim the top two corners on both panels to prevent bunching(be careful not to cut too close to the stiches). Turn both pieces inside out and iron them. You make need to push something gently up into the corners to get them to sit properly, my tool of choice for this is the end of a paint brush or a knitting needle.
8. Sew the panels together. Pin the front and back panel together with the exteriors facing in. Sew along the bottom with a 1/2" seam allowance.
9. Sew the sides. Flip it so that the right sides are facing out and iron it flat. For this step I switch to hand sewing because the sewing machine I have can't handle this many layers, but if you have a better sewing machine you can use it for this step instead. Make sure the opening at the top is lined up on both sides and sew around both sides and the bottom, leaving the top open.
Hope that was clear and understandable. Please let me know if there are any confusing parts. Thanks for looking :)


Hi,i think this is a good tute,but maybe you could specify when the right/wrong sides of the fabric should be facing during the sewing process? Good job! :)
ReplyDeleteThanks so much. I added directions about the right/wrong side of the fabric to a couple steps that didn't mention it originally. Hope that helps!
DeleteThis is awesome, I'm making this for myself and my boys. Thanks for the tutorial
ReplyDeleteThanks for your honesty. This is my first attempt at writing a tutorial for anything and I'd love to improve if I could. What specifically is wrong with it?
ReplyDeleteI just sewed mine! I am a beginner and am using a singer from the early 1950's. I could easily follow it. "Anonymous" is just a jerk.
ReplyDeleteSeems fairly easy, I make decorative bags and I need to make something like this for a friend to carry her cell phone, id and a credit card and cash...
ReplyDelete